
3D Revolution

Free tool · Open source

Primed3D

A free browser tool for painting 3D models ready for printing.
Paint with the filaments you already own and export solid colours for conventional multi-colour printing, or have Primed3D convert your painting into dithered colour layer lines, so three to five filaments can cover the whole spectrum.

Completely free Runs in your browser Nothing is uploaded No account needed
Latest Primed3D video
Finding the latest video…

What it does

Paint the model.
Then choose how it prints.

Primed3D can be used in a wide range of ways, but there are two main ways you can process the painting before export.

Route one

Conventional multi-colour

Paint using the filaments you actually own, then export solid colours, one filament per colour, exactly like any other multi-material print. No dithering, no special layer height, no slicer gymnastics. Set the palette size to match your AMS slots and go.

This is the one most people want. If you have a multi-colour printer and you just want to paint a model properly before printing it, stop here.
Route two

Full-spectrum colour

Or have Primed3D convert your painting into dithered cyan, magenta and yellow layer lines, with optional inclusion of white and/or black. Three to five filaments then cover the entire spectrum, including gradients, skin tones and photographs, on the printer you already own.

The trade-off is that the print needs a specific layer height to match the export, requires a lot of filament changes, and may not look as clean under closer inspection.

Your printer already mixes colour. It just doesn't know it.

Printed magazines have made full-colour images out of four inks for over a century. Look closely and there's no orange ink on the page. There are tiny cyan, magenta and yellow dots, and your eye does the mixing.

An FDM printer lays down lines about a tenth of a millimetre thick. Primed3D applies the same trick vertically: it slices your painted model into layers and assigns each layer's slice the filament that best serves the colour you painted. Stacked up, alternating cyan, magenta and yellow lines blend optically into the colour you asked for.

What you need

  • A multi-material printer, or a manual filament-change workflow
  • For conventional prints: whatever filaments you want to use
  • For full-spectrum: cyan, magenta and yellow, plus white and black which help a lot
  • Bambu Studio, OrcaSlicer or PrusaSlicer
  • A browser

Everything runs on your own machine. Your models never leave it. There's no server to send them to.

Choose first

Two painting modes

Pick before you start painting, because switching modes clears the model.

Full Spectrum (Standard)

Paint in any colour at all

No restrictions on the palette. Pick any colour you like from the picker and paint with it. Primed3D works out how to build it later.

It's aimed primarily at CMY printing, where your painting is decomposed into dithered cyan, magenta and yellow layer lines. But it doesn't have to be: switch the filament mode to Solid Colours (No Dithering) at export and the same painting comes out as block colours for conventional multi-colour printing.

Use it when you want a colour you don't own, a photograph, or a smooth gradient.

Filament Palette (Custom Blend)

Paint with the filaments you own

Enter the exact number of filaments you have and their exact colours, up to 25, and paint using only those. Most faces then export as a single solid filament, ready for conventional multi-colour printing.

You can also blend two or three of your filaments on weight sliders to reach a colour that sits between them. Those faces, and any gradients, are built from dither lines just like Full Spectrum mode. The rest stay solid.

Use it when you know exactly what's loaded in the printer and want predictable, mostly-solid output.

The real difference is the palette, not the output. Full Spectrum lets you paint in absolutely any colour with no restrictions. Filament Palette limits you to the filaments you actually have, and blends of them. Both can produce solid-colour prints, and both can produce dithered ones.

Quick start

From STL to printed colour

The standard workflow, in order.

  1. Load and orient

    Drag an STL, 3MF or OBJ onto the viewport (GLB too, in the beta). For OBJ files with external textures, drop the .obj, .mtl and image together in one go. Use Orient and click the face that should sit flat on the plate, then Scale if you need to resize.

  2. Add resolution, if the model needs it

    A low-poly model can't hold fine colour. Add resolution before painting, because it can't be undone once you've started.

  3. Paint

    Pick a colour, then use Brush, Sphere, Fill, Band, Gradient or Photo. Set a Base Colour for everything you don't paint. Ctrl+Z and Ctrl+Y undo and redo.

  4. Choose a filament mode and process

    WKCMY gives the widest colour range at five filaments. Hit Process, then download the 3MF from the viewport.

  5. Slice at the matching layer height

    Import into your slicer, set the layer height to whatever you exported at, 0.08 mm normally or 0.06 mm for high quality, and assign the filament slots in the exported order.

Before you paint

Preparing the model

Most disappointing results trace back to this stage rather than the painting.

Orient

If you plan to export your model with any sort of dither lines, whether that be CMY printing or using a custom blend, your model needs to be in the same orientation you plan to print it in before you process it in Primed3D. Dithering works by stacking vertical layer lines, so the orientation at processing time is the orientation the colour is built for.

Scale

Set exact dimensions in millimetres or scale by percentage. If you plan to use any form of dither lines, whether CMY or custom blend, it is vital that you have scaled the model to the exact size you plan to print it at before processing. Ideally, scale before you begin painting.

Simplify Colours

Collapses the model's colours down to a chosen number, from 4 to 128.

Increases triangle count without modifying visible geometry.

The toolbar

Paint tools

Six ways to get colour onto a mesh, each suited to a different shape of job.

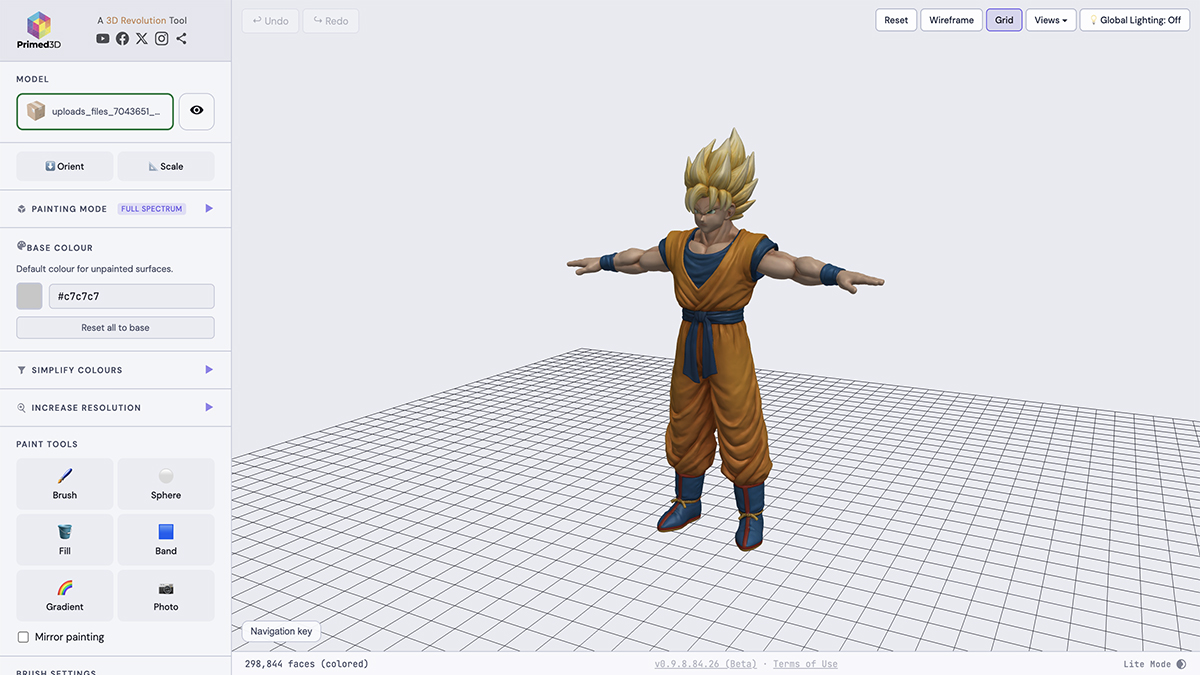
A model being painted in Primed3D
Painting a model in Primed3D

Brush

Click and drag to paint visible faces. The stroke spreads across the surface within the radius and stays on that surface, so it won't bleed around a corner onto the other side.

Sphere

Paints everything inside a 3D sphere, including faces hidden behind or inside the model. The tool for hollow shapes and awkward interior geometry.

Fill

Connected will fill all areas of connected colour to the spot you click, up to the variance in the colour that you select. Angle Limit will ignore the existing colour but will fill up to a change in the geometry on the model larger than the angle you set.

Band

A coloured slab cuts through the model at a thickness, position, rotation and pitch you set. Click the model to move it there, then apply to paint every face inside the slab. Stripes, waterlines, banded terrain.

Gradient

Runs a gradient between two colours across the whole model or a selection. Set direction with rotation and pitch (the arrow in the viewport shows it), shift the midpoint with Centre, and set how many discrete bands it uses with Steps.

Photo

Projects a JPG or PNG onto the model from the current camera angle. Position, scale and rotate the overlay in the viewport, then apply. Transparent PNG backgrounds are respected.

Colour tolerance: the setting worth understanding

The Fill tool's Colour Tolerance slider decides how strict the colour match has to be, and the same slider appears inside the Gradient and Photo tools' selection sub-tools.

ToleranceFillsUse it for
0%Only the exact colour you clickedClean hand-painted boundaries you drew yourself
Around 5%Close shadesGeneral work, the sensible default
HigherAnything in the same familyTextured imports and photo projections, where every face is a slightly different shade of the same colour

Photo projection

Project a photo or SVG onto the model and have it applied as painting.

Solid and Blend painting

In Filament Palette mode, the colour choices split into two sections. Solid paints with any single filament from your list, and those areas are exported as a flat single colour. Blend allows you to mix two or three of your filaments, setting how much you would like to use of each, to create brand new colours for painting. These colours are produced on export with dithered colour lines of the filaments you used.

Process & export

Turning paint into filament

Where you decide how many filaments you're printing with, and how clean the result should be.

Filament modes

ModeFilamentsBest for
CMY3Vibrant bright colours. The minimum viable setup.
WCMY4Adds white for cleaner pastels and highlights.
KCMY4Adds black for richer darks and more depth in saturated colours.
WKCMY5Best overall accuracy. The default for photographs.
2 Filaments2Dual-nozzle machines. Dithers between two chosen colours.
Solid ColoursYour choiceNo dithering at all. Normal multi-colour printing with an AMS, no special slicer settings.

Solid Colours has a Palette Size setting that clusters your painted colours down to a fixed number. Set it to match your slicer's filament slots, so eight colours for an eight-slot AMS. It also doubles as a save format: export as Solid at Full Spectrum, re-import the 3MF, and carry on painting.

Colour adjustments

The dither algorithm is a mathematical calculation based on percentage of colours to create other colours. This means even a region meant to be flat white gets a mix of other colours sprayed throughout it. These three settings suppress that noise. They only appear when the active mode includes white or black, since those are the filaments being cleaned.

Clean white / Clean black

Independent checkboxes, each with a Light / Standard / Aggressive severity. They snap low-saturation light faces to pure white, and low-saturation dark faces to pure black.

Light only touches near-pure faces. Standard handles most baked-shading drift. Aggressive catches tinted greys and colour bleed, but watch for it flattening an intentionally peach-tinted white.

Vivid colours

Targets the saturated regions instead of the neutrals. Scales back white and black in proportion to saturation, and drops trace filament demands below 5% into the dominant filaments.

The trade-off: black is what gives a deep red its depth. Remove it and the recipe is more mathematically correct but reads as pinker. Use it when speckle bothers you more than richness.

Translucent black

For translucent black filament, which doesn't carry the visual weight of an opaque one. Increases the black in the dither by 75% to restore its impact while keeping the blending smooth.

Process mode and layer height

SettingWhat it does
StandardPer-face dithering. Accurate, but every face works out its own dither pattern independently.
Single Colour LayersCollapses each layer to one filament. Fewer changes, simpler prints, less colour nuance. An option limits this to layers that actually contain blends or gradients.
0.08 mmStandard quality. Sensible print times and file sizes.
0.06 mmHigh quality. Finer dither, longer prints, bigger files.

Settings worth knowing about

Compress export file size

On by default. Shares geometry between connected faces of the same colour and routinely produces files 90% smaller with no loss of detail. Leave it on.

Auto-repair mesh on export

Off by default, because most models don't need it and it costs processing time. Turn it on if your slicer reports open or non-manifold edges, refuses to slice, or crashes on load. It seals every seam the colour processing creates into a watertight mesh.

Filament colours

Set the hex codes of the filaments you own. This affects the slicer preview only. The dithering maths always uses ideal CMY theory regardless of brand.

Save project

Writes a .primed3d file holding the geometry, every painted face, your base colour, painting mode, filament setup and tool state. The lossless way to stop halfway through a big paint job. Drop it back on the viewport to resume.

In the slicer

Getting the settings right

A dithered export only works if the slicer builds the layers the way the export expects.

SettingValue
Layer heightExactly what you exported at: 0.08 mm, or 0.06 mm for high quality. This is the one that matters.
Confirmed slicersBambu Studio, OrcaSlicer and all its variants (Snapmaker, Flashforge, Creality), and PrusaSlicer.

If the colours look wrong on the printed part, check the layer height first. A model exported for 0.08 mm and sliced at 0.2 mm will print, but the dither bands won't line up and the colour won't be what you painted.

Imports

What you can drop on it

STL

Binary and ASCII both work. STL carries no colour, so you paint from scratch.

3MF

Brings in geometry plus colour from Bambu Studio paint assignments, base material colours and per-filament colour groups. A model you already painted in Bambu Studio arrives with its colours intact.

OBJ

Colour is read from three sources, in this order:

  • Vertex colours: what 3D scanners (Polycam, RealityScan), AI model generators (Luma, Meshy) and point-cloud tools produce. Drop the .obj on its own.
  • UV texture map: photogrammetry and most modelling software. Drop the .obj, .mtl and texture image together in one drag. An .obj plus an image works too; Primed3D creates a default material.
  • MTL diffuse colour: CAD and modelling exports. Each material's colour is assigned to the faces using it.

For UV-textured imports, Simplify Colours helps if baked-in lighting is making the output stripey.

GLB

Beta only GLB import is in the closed beta at the moment, not the public release. It brings in geometry along with its embedded colour and texture data, which makes it a straightforward route in from Blender, scanning apps and AI model generators that export glTF.

Available to Patreon supporters and channel members until it lands in a public update.

.primed3d

A saved Primed3D session. Drop it on the viewport to restore everything exactly as you left it, including painting mode and tool state, which a 3MF can't carry.

Closed beta

Try new features first

The public version stays free for everyone, always. The closed beta is where new tools land first. Try them early, tell me what's broken, and shape what makes it into the next release.

Primed3D stays free

It's free to use, free to modify and free to share, under an open-source licence. Your files are processed entirely in your browser. There are no accounts, no tracking and no analytics, because there's no server involved at all.

Common questions

Before you ask

Do I need a special printer?

No. Any 3D printer that can automate filament changes mid-print will work. The export is a standard 3MF with Bambu-style colour data, which Bambu Studio, OrcaSlicer and PrusaSlicer all read, so whatever those slicers drive is fine.

For CMY printing specifically, the printer needs to handle 3-5 filaments: cyan, magenta and yellow at minimum, with white and black improving the range considerably.

A toolhead or nozzle changer is ideal, because dithered prints swap filament constantly and a single-nozzle machine purges material on every change. It still works on a purge-based system like an AMS, it just wastes a lot more filament getting there.

Are my models uploaded anywhere?

No. Primed3D runs entirely in your browser. Nothing is sent to a server, there are no accounts, and there's no tracking or analytics. Your files stay on your machine.

Why does my print have horizontal stripes?

Usually baked-in shading. If every face is a marginally different shade, each dithers to a slightly different mix and adjacent faces stack into visible bands. Try running Simplify Colours at a low number before exporting.

Why does my print have speckles in flat colour?

That's the dither being statistically honest. Turn on Clean white or Clean black for neutral regions, or Vivid colours for saturated ones, in the Colour Adjustments section of Process & Export.

Can I use it commercially?

Yes. It's free for personal and commercial use. It comes with no warranty, and print results depend on your printer, filament, slicer and model, so treat the recommended settings as a starting point rather than a guarantee.